Introduction
The problem
I have an electric guitar laying around as well as a cheap vox amp. The problem with this is:
- The amp I have now has limited effects
- To avoid making too much noise during practicing I would like to use my wireless headset
The vox amp I have obviously allows a jack out to a wired headset, but that gives me two cables to the amp!

I have been playing around with little linux devboards (like
the raspberry pi) for quite a while, and figured it must be possible to do
–some- sort of amp emulation onto it. So I head out for a little project.
The solution
And behold, a wifi-connected linux arm box in my pants, serving
as portable amp + wireless transmitter


You can download the full SD card image for the hardware here.
Just flash it, and use the same hardware as I did, and it will work! (password root:guitar , wifipassword: guitarguitar)
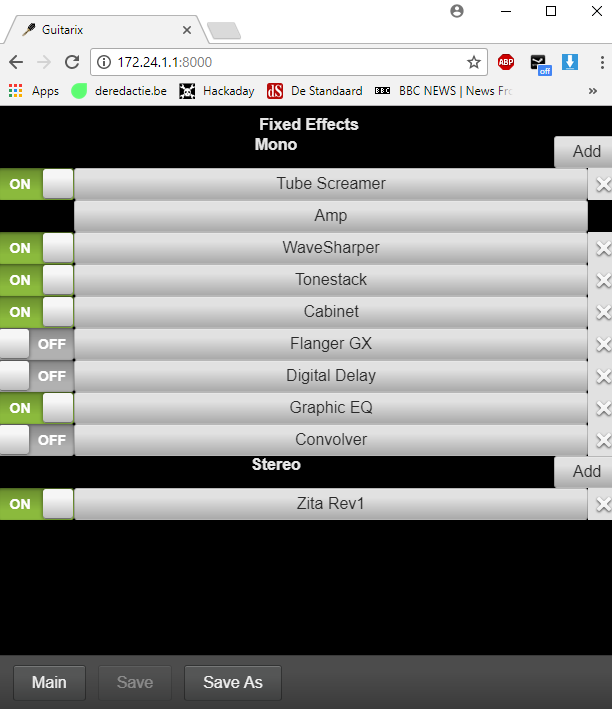
Surf though your favorite webbrowser to http://172.24.1.1:8000 and control all your virtual amp settings!
Just flash it, and use the same hardware as I did, and it will work! (password root:guitar , wifipassword: guitarguitar)
Surf though your favorite webbrowser to http://172.24.1.1:8000 and control all your virtual amp settings!
In case you are interested in all the details of the project, continue scrolling:)
The build and how-to
Step 1: Getting the basic hardware and software up and running
The guitar

You obviously need an electric guitar. For the audio output, I have simple
converter to 3.5mm to connect to my linux box.
The linux board
For the hardware I bumped into an article from cnx software
(https://www.cnx-software.com/2017/07/30/how-to-setup-an-orange-pi-zero-diy-smart-speaker-with-google-assistant-sdk/)
showing a nice case for the orange pi zero along with an expansion board for
some more USB stuff. It is small, has a powerful processor, enough USB ports,
onboard wifi, and is very cheap (18$). Sure, a raspberry 3 would have done the
trick too for a bit more money, but I thought I’d give this one a try now.
This is a small overview from http://www.orangepi.org/orangepizero/
:

When shipped along with the expansionboard and case, it looks like this:


An extra sound card
Even though the expansion board has a jack out, it does not
offer jack-in. That’s sort of required to get the guitar sound inside of the
processor. 2$ (!) gets you this USB sound card which will do just fine :

My wireless headset
This I had already (A Logitech H600), and use it mostly for
my laptop. I’m very happy with it. It interfaces towards linux as just another
USB sound card. Any other wireless headset will do, as long as it has linux
drivers for it.

A power bank


Everything together:

Step 2: Running linux amp software
Jackd and guitarix
I did not know this until I started this project, but as it
turns out some people already have been working hard at exactly what I was
searching for. The main project is called guitarix,
and it uses the low latency jackd as backend.
Please do check out their amazing work at guitarix.org
They basically aim at running the software on a desktop pc,
and using their graphical interface:


Together with jackd (qjackctl screenshot above) you can
quite quickly turn a PC with a basic sound card (e.g microphone in and
headphones out) into a guitar amp with loads of effects!
I would really recommend trying this out. You just need to
download a liveCD. I used the one they recommend (AV linux) http://www.bandshed.net/AVLinux.html;
and tried it on my laptop. And it worked!
I also got it to work with my headset, however I did need to
set a samplerate of 48000 (instead of 44100, since the audio driver from my
headset did not support that rate)
Running it on the orange pi
So far so good, I had the setup running on a PC. Now I just
had to do the same thing on a smaller pc. Simple right?
Operating system
Where raspberry pi’s have a debian based distro called
raspbian, these “other arm boards” also
have a distro backing them called “armbian”. It’s pretty cool, and worth
checking out at https://www.armbian.com/orange-pi-zero/
I just downloaded the “stable” version, flashed it on an SD
card, and ran it. It works. Just connected to Ethernet, let DHCP do its job,
and log in
ogin as: root
root@172.24.1.1's password:
  ___                               ____  _   _____
 / _ \ _ __ __ _ _ __   __ _  ___  |  _ \(_) |__  /___ _ __ ___
| | | | '__/ _` | '_ \ / _` |/ _ \ | |_) | |   / // _ \ '__/ _ \
| |_| | | | (_| | | | | (_| |  __/ |  __/| |  / /|  __/ | | (_) |
 \___/|_|  \__,_|_| |_|\__, |\___| |_|   |_| /____\___|_|  \___/
                       |___/

Welcome to ARMBIAN 5.35 user-built Ubuntu 16.04.3 LTS 4.14.8-rt9-sunxi
System load:   0.17 0.21 0.18   Up time:       11 min           Local users:   2
Memory usage:  23 % of 493MB    IP:            169.254.6.213 172.24.1.1
CPU temp:      56°C
Usage of /:    14% of 15G

Last login:
Armbian also comes with a handy tool called armbian-config,
which does the hard work for you to set up the wifi chip as APmode:

Once that’s done, we can continue with installing jackd and
guitarix
apt-get install jackd qjackctl guitarix
So, how do we run jackd? On the liveCD, I used qjackctl to
configure it. However, the orange pi zero has no HDMI output, so running
graphical applications is not trivial.
I installed Xming (https://sourceforge.net/projects/xming/
). This very cool piece of software runs an X server on windows. (If you run
linux natively, you can of course skip this step, since you are most likely already
running an X server)
Once that’s done, you can just start an SSH session with
X-forwarding. If you run linux natively, this is just doing ssh –X
root@IPADDRESS. In my case, I set up putty on windows do to the trick.

Once qjackctl ran, I tried to simply loop the audio from the
input (microphone) to my headset (stereo). By clicking connections, you can do
this. Note again that I had to match the samplerate to 48000 to make it work.
If I did change the frame size lower (to reduce latency) I
did run into quite a lot of issues of xruns and hang-ups of jackd, which I
addressed in the following steps. But at least now already the basic concept
worked!

Trying guitarix
With jackd running, I tried running guitarix.
Success!

Even though there is still a huge delay, you can now use all
the effects of guitarix on the mini PC!!
Step 3: Running guitarix headless (without x server)
A headless read-only system
Even though the proof of concept worked, I still needed
X-forwarding to run guitarix. The end goal is of course is to run the deamons
without any screen attached, just a boot. Moreover, one way or another, SD
cards will let you down eventually when you use them as a rw filesystem. But as
long as you use them read-only, it just works. And you can unplug the device at any point in time, without ever
having to worry about filesystem corruption.
Making jackd and guitarix run in a read-only headless
environment wasn’t exactly trivial. But some googling and hands-on testing got
me there.
Headless jackd
Since the jackd installed by the debian package was built
with dbus, it does not like starting without any X-related dbus stuff
apparently. But, there is a simple hack around this:
export DBUS_SESSION_BUS_ADDRESS=unix:path=/run/dbus/system_bus_socket

/usr/bin/jackd -dalsa -r48000 -p256 -D -Chw:Device,0 -Phw:Headset,0  &
Jackd did not have any issue not being able to write to the filesystem, so read-only mode worked just fine.
Headless guitarix
Guitarix needs the bash home variable in order to try and
find the config. If I try to run a script from rc.local for example, this is
not set. Hence, the following is needed:
export HOME=/root
Guitarix also really does not like read-only filesystems. It
tries to write some config every time it starts, and if it fails, it gives up.
So basically what I quickly came up with, is to mount a tmpfs in the guitarix
directory, which is rw. The changes will be lost, but that’s fine by me. I
tarred the current config of guitarix which I found nice, and made sure it was
restored each boot.
mount -t tmpfs none /root/.config/guitarix/
mount -t tmpfs none /var/lib/misc/
cp /root/guitarixconf.tar /root/.config/guitarix/
cd /root/.config/guitarix/
tar xf guitarixconf.tar
guitarix -i system:capture_1 -o system:playback_1  -o system:playback_2 -b E:1 -nogui &
Controlling guitarix through wifi
I now had the system booting directly into a mode where the
linux amp kicked in, but what if I wanted to change a setting? Like the gain,
effects, etc.
Turns out guitarix has a JSON-API and a python webserver
with a basic webinterface to do just
that!
Just start the python program after starting guitarix, and
navigate to the website. Ideal for surfing to on your smartphone to control the
device!
cd /root/guitarix-webui/guitarix-webui-0.34.0/websockify/
python websocketproxy.py --web=../webui '*':8000 localhost:7000

To allow using a smartphone to connect wirelessly to the
box, you can configure a wireless hotspot on the zero. The armbian has a nice
tool (like rpi-config) that allows you to set this up. If you want to do it
manually, just configure hostapd and dnsmasq appropriately, and let linux take
care of the magic.
Step 4: Reducing latency with a realtime kernel
I basically did step 2 and 3 in about one evening. Getting
the latency down took more than double of the time, but was also a pretty cool
investigation.
As every line of the jackd or guitarix documentation says,
you should run this on a real-time kernel. The armbian image I downloaded did
not run this, hence the issues when trying to go to lower delays. So, up to
recompiling a new kernel!
RT-linux patching
In contrast to the raspberry pi, the linux kernel support
for the orange pi (sunxi) is rather shady. Especially if you want the video
acceleration, you basically are forced to stay at an old 3.x kernel, which is
again different from mainline
This is important, since in order to get real good real-time
performance, you should use 1) a recent kernel, and 2) apply the RT patch (https://rt.wiki.kernel.org/index.php/Main_Page)
There is a topic on armbian which covered this: https://forum.armbian.com/topic/1885-rt-patches-for-sun8i-kernel/
People reported good results by trying a current mainline in
the armbian build tool and applying the RT-patch. So I set out to do the same.
Building a new kernel
Turns out that building a kernel for armbian is pretty easy.
Just follow https://docs.armbian.com/Developer-Guide_Build-Preparation/
git clone --depth 1 https://github.com/armbian/build
cd build
./compile.sh
You get a nice menu that allows you to select which kernel
to build, allows you to change kernel options etc.
It does automatically apply a set of patches in the folder “userpatches”
It does automatically apply a set of patches in the folder “userpatches”
Building a specific kernel with the RT patch
At the time of writing, the latest mainline kernel with an
RT patch was 4.18.8-RT9
I downloaded the patch, and placed it into the appropriate
directory:
ls userpatches/kernel/sunxi-next/
patch-4.14.8-rt9.patch
patch-4.14.8-rt9.patch
Then I did not immediately find a way to specify to the
build tool to fetch a specific tag of the linux kernel (instead of default to the very
latest) Doing a small patch was the fastest way I got it working. :
diff --git a/config/sources/sunxi_common.inc b/config/sources/sunxi_common.inc
index 4fc872f..aae8829 100644
--- a/config/sources/sunxi_common.inc
+++ b/config/sources/sunxi_common.inc
@@ -24,7 +24,8 @@ case $BRANCH in

        next)
        KERNELSOURCE=$MAINLINE_KERNEL_SOURCE
-       KERNELBRANCH='branch:linux-4.14.y'
+       #KERNELBRANCH='branch:linux-4.14.y'
+       KERNELBRANCH='tag:v4.14.8'
        KERNELDIR=$MAINLINE_KERNEL_DIR

        GOVERNOR=ondemand
(Note that I used the following tag of the armbian build
repo: 9531d1bc7ecd0f468e29e402ba00cbc7b7dd683f)
After running another compile.sh, and enabling the
correct options in the linux kernel menu (PREEMPT_RT_FULL), this gives a new
uboot and new kernel debian packages.
These can just be uploaded and installed on the target. A
new reboot and you are running a very fresh, very fast recent linux kernel!
Fixing fixed frequency for effective RT behavior
A good program to test the RT behavior is cyclic test. The
output looks somewhat like this:
Linux orangepizero 4.14.8-rt9-sunxi #1 SMP PREEMPT RT Sat Jan 6 14:36:31 CET 2018 armv7l armv7l armv7l GNU/Linux
/root/rt-tests/cyclictest -p 80 -t5 –n
# /dev/cpu_dma_latency set to 0us
policy: fifo: loadavg: 0.85 0.49 0.22 4/168 3083

T: 0 ( 3079) P:80 I:1000 C:   3297 Min:      8 Act:   17 Avg:   16 Max:      66
T: 1 ( 3080) P:80 I:1500 C:   2198 Min:      8 Act:   24 Avg:   15 Max:      50
T: 2 ( 3081) P:80 I:2000 C:   1648 Min:      8 Act:   11 Avg:   16 Max:      60
T: 3 ( 3082) P:80 I:2500 C:   1318 Min:      8 Act:   12 Avg:   15 Max:      44
T: 4 ( 3083) P:80 I:3000 C:   1098 Min:      9 Act:   17 Avg:   18 Max:      57
You should make sure the maximum latency stays below 100 at least
.
In my first attempts with my newly compiled kernel, this hit 3000+ regularly! Meaning the
RT patch clearly was not effective. Turned out a bit more work was needed
CPU Frequency Scaling Govenor
Apparently, to save power and dynamically adjust cpu
frequency, the linux cpu governor regularly changed frequency, and this had a
very bad effect on the RT behavior. When forcing the governor to performance
mode or userspace mode, I suddenly got much better results!
echo userspace > /sys/devices/system/cpu/cpufreq/policy0/scaling_governor
echo 960000 > /sys/devices/system/cpu/cpufreq/policy0/scaling_min_freq
echo 960000 > /sys/devices/system/cpu/cpufreq/policy0/scaling_setspeed
Forcing fixed frequency
You’d think that that was the end of it, and so did I.
Strangely enough, even when forcing the governor to a fixed frequency, the
linux kernel –still- once in a while (like after a minute, depending on jackd
realtime settings) shifted frequency, causing massive spikes in latency, and
freaking out jackd. After investigating the kernel a bit further, it seems that
it has some sort of protection that it will force to a lower operating point (OPP)
regardless of the governor, to avoid any damage to the CPU whatsoever. Even
though that sounds like a nice feature, the CPU can handle this load just fine,
and this just messes up the real-time behavior.
The final fix that I needed to do to get consistently good
RT performance, was to remove all other operation points from the device tree!
You can simply decompile the devicetree and recompile it using the DTC tool
like so:
dtc  -I dtb -O dts sun8i-h2-plus-orangepi-zero.dtb > sun8i-h2-plus-orangepi-zero.dts
dtc -I dts  -O dtb sun8i-h2-plus-orangepi-zero.dts > sun8i-h2-plus-orangepi-zero.dtb
Once in the dts format, you just locate the operating points, and only leave in the 960Mhz.
And success! Cyclic test keeps running forever without any
spikes!
root@orangepizero:~# uname -a
Linux orangepizero 4.14.8-rt9-sunxi #1 SMP PREEMPT RT Sat Jan 6 14:36:31 CET 2018 armv7l armv7l armv7l GNU/Linux
/root/rt-tests/cyclictest -p 80 -t5 –n
# /dev/cpu_dma_latency set to 0us
policy: fifo: loadavg: 0.85 0.49 0.22 4/168 3083

T: 0 ( 3079) P:80 I:1000 C:   3297 Min:      8 Act:   17 Avg:   16 Max:      66
T: 1 ( 3080) P:80 I:1500 C:   2198 Min:      8 Act:   24 Avg:   15 Max:      50
T: 2 ( 3081) P:80 I:2000 C:   1648 Min:      8 Act:   11 Avg:   16 Max:      60
T: 3 ( 3082) P:80 I:2500 C:   1318 Min:      8 Act:   12 Avg:   15 Max:      44
T: 4 ( 3083) P:80 I:3000 C:   1098 Min:      9 Act:   17 Avg:   18 Max:      57
Important sidenote of fixed OPP
One important sidenote of using a fixed opp, is that in very
heavy load, the cpu actually becomes so warm that the linux kernel (having no
other option since we removed the other OPPs) decides to reboot the device! I
only saw this ever happening when running a parallel compilation on all 4 cores
though. When just using it with guitarix/webstuff, I never got it to crash so
far:) You can also just lower the frequency or go save with a heatsink of
course if you’d want to.
Patching jackd to deal with latency spikes
While investigating the RT issues with the linux kernel, I
also noticed that jackd really got completely messed up when it received a bit
latency spike. Instead of noting an XRUN and just recovering, it never did
recover. I always then had to kill the process with the SIGKILL, and restart
it. Even though that works, it is really slow and requires manual action.
Surely there must be a better way?
And there is. Turns out there was a bug in the jackd alsa
driver when coping with xruns
In the function alsa_driver_xrun_recovery, the linux driver
is not told to again reset its buffers to a sane position upon overrun. As a
result, after a recovery, immediately another overrun can occur. To fix this, I
just had to trigger a recovery (snd_pcm_prepare) after an actual xrun was
detected:
if (snd_pcm_status_get_state(status) == SND_PCM_STATE_XRUN && driver->process_count > XRUN_REPORT_DELAY) {
       struct timeval now, diff, tstamp;
       driver->xrun_count++;
       snd_pcm_status_get_tstamp(status,&now);
       snd_pcm_status_get_trigger_tstamp(status, &tstamp);
       timersub(&now, &tstamp, &diff);
       *delayed_usecs = diff.tv_sec * 1000000.0 + diff.tv_usec;
       jack_log("**** alsa_pcm: xrun of at least %.3f msecs",*delayed_usecs / 1000.0);
       if (driver->capture_handle) {
           if ((res = snd_pcm_prepare(driver->capture_handle)) < 0) {
               jack_error("error preparing after xrun: %s", snd_strerror(res));
           }
       } else {
           if ((res = snd_pcm_prepare(driver->playback_handle)) < 0) {
                   jack_error("error preparing after xrun: %s", snd_strerror(res));
           }
I downloaded the source using apt-get source, and built it
again with debuild –us –uc, and installed it locally. And voila, a working
system!
Conclusion
This was a cool project, which hadn't been possible for the awesome open source community that provided many of the tools and toys to make this possible.
Linux rocks:)

