Introduction
The problem
I have an electric guitar laying around as well as a cheap vox amp. The problem with this is:
- The amp I have now has limited effects
- To avoid making too much noise during practicing I would like to use my wireless headset
The vox amp I have obviously allows a jack out to a wired headset, but that gives me two cables to the amp!

I have been playing around with little linux devboards (like
the raspberry pi) for quite a while, and figured it must be possible to do
–some- sort of amp emulation onto it. So I head out for a little project.
The solution
And behold, a wifi-connected linux arm box in my pants, serving
as portable amp + wireless transmitter


You can download the full SD card image for the hardware here.
Just flash it, and use the same hardware as I did, and it will work! (password root:guitar , wifipassword: guitarguitar)
Surf though your favorite webbrowser to http://172.24.1.1:8000 and control all your virtual amp settings!
Just flash it, and use the same hardware as I did, and it will work! (password root:guitar , wifipassword: guitarguitar)
Surf though your favorite webbrowser to http://172.24.1.1:8000 and control all your virtual amp settings!
In case you are interested in all the details of the project, continue scrolling:)
The build and how-to
Step 1: Getting the basic hardware and software up and running
The guitar

You obviously need an electric guitar. For the audio output, I have simple
converter to 3.5mm to connect to my linux box.
The linux board
For the hardware I bumped into an article from cnx software
(https://www.cnx-software.com/2017/07/30/how-to-setup-an-orange-pi-zero-diy-smart-speaker-with-google-assistant-sdk/)
showing a nice case for the orange pi zero along with an expansion board for
some more USB stuff. It is small, has a powerful processor, enough USB ports,
onboard wifi, and is very cheap (18$). Sure, a raspberry 3 would have done the
trick too for a bit more money, but I thought I’d give this one a try now.
This is a small overview from http://www.orangepi.org/orangepizero/
:

When shipped along with the expansionboard and case, it looks like this:


An extra sound card
Even though the expansion board has a jack out, it does not
offer jack-in. That’s sort of required to get the guitar sound inside of the
processor. 2$ (!) gets you this USB sound card which will do just fine :

My wireless headset
This I had already (A Logitech H600), and use it mostly for
my laptop. I’m very happy with it. It interfaces towards linux as just another
USB sound card. Any other wireless headset will do, as long as it has linux
drivers for it.

A power bank


Everything together:

Step 2: Running linux amp software
Jackd and guitarix
I did not know this until I started this project, but as it
turns out some people already have been working hard at exactly what I was
searching for. The main project is called guitarix,
and it uses the low latency jackd as backend.
Please do check out their amazing work at guitarix.org
They basically aim at running the software on a desktop pc,
and using their graphical interface:


Together with jackd (qjackctl screenshot above) you can
quite quickly turn a PC with a basic sound card (e.g microphone in and
headphones out) into a guitar amp with loads of effects!
I would really recommend trying this out. You just need to
download a liveCD. I used the one they recommend (AV linux) http://www.bandshed.net/AVLinux.html;
and tried it on my laptop. And it worked!
I also got it to work with my headset, however I did need to
set a samplerate of 48000 (instead of 44100, since the audio driver from my
headset did not support that rate)
Running it on the orange pi
So far so good, I had the setup running on a PC. Now I just
had to do the same thing on a smaller pc. Simple right?
Operating system
Where raspberry pi’s have a debian based distro called
raspbian, these “other arm boards” also
have a distro backing them called “armbian”. It’s pretty cool, and worth
checking out at https://www.armbian.com/orange-pi-zero/
I just downloaded the “stable” version, flashed it on an SD
card, and ran it. It works. Just connected to Ethernet, let DHCP do its job,
and log in
ogin as: root
root@172.24.1.1's password:
  ___                               ____  _   _____
 / _ \ _ __ __ _ _ __   __ _  ___  |  _ \(_) |__  /___ _ __ ___
| | | | '__/ _` | '_ \ / _` |/ _ \ | |_) | |   / // _ \ '__/ _ \
| |_| | | | (_| | | | | (_| |  __/ |  __/| |  / /|  __/ | | (_) |
 \___/|_|  \__,_|_| |_|\__, |\___| |_|   |_| /____\___|_|  \___/
                       |___/

Welcome to ARMBIAN 5.35 user-built Ubuntu 16.04.3 LTS 4.14.8-rt9-sunxi
System load:   0.17 0.21 0.18   Up time:       11 min           Local users:   2
Memory usage:  23 % of 493MB    IP:            169.254.6.213 172.24.1.1
CPU temp:      56°C
Usage of /:    14% of 15G

Last login:
Armbian also comes with a handy tool called armbian-config,
which does the hard work for you to set up the wifi chip as APmode:

Once that’s done, we can continue with installing jackd and
guitarix
apt-get install jackd qjackctl guitarix
So, how do we run jackd? On the liveCD, I used qjackctl to
configure it. However, the orange pi zero has no HDMI output, so running
graphical applications is not trivial.
I installed Xming (https://sourceforge.net/projects/xming/
). This very cool piece of software runs an X server on windows. (If you run
linux natively, you can of course skip this step, since you are most likely already
running an X server)
Once that’s done, you can just start an SSH session with
X-forwarding. If you run linux natively, this is just doing ssh –X
root@IPADDRESS. In my case, I set up putty on windows do to the trick.

Once qjackctl ran, I tried to simply loop the audio from the
input (microphone) to my headset (stereo). By clicking connections, you can do
this. Note again that I had to match the samplerate to 48000 to make it work.
If I did change the frame size lower (to reduce latency) I
did run into quite a lot of issues of xruns and hang-ups of jackd, which I
addressed in the following steps. But at least now already the basic concept
worked!

Trying guitarix
With jackd running, I tried running guitarix.
Success!

Even though there is still a huge delay, you can now use all
the effects of guitarix on the mini PC!!
Step 3: Running guitarix headless (without x server)
A headless read-only system
Even though the proof of concept worked, I still needed
X-forwarding to run guitarix. The end goal is of course is to run the deamons
without any screen attached, just a boot. Moreover, one way or another, SD
cards will let you down eventually when you use them as a rw filesystem. But as
long as you use them read-only, it just works. And you can unplug the device at any point in time, without ever
having to worry about filesystem corruption.
Making jackd and guitarix run in a read-only headless
environment wasn’t exactly trivial. But some googling and hands-on testing got
me there.
Headless jackd
Since the jackd installed by the debian package was built
with dbus, it does not like starting without any X-related dbus stuff
apparently. But, there is a simple hack around this:
export DBUS_SESSION_BUS_ADDRESS=unix:path=/run/dbus/system_bus_socket

/usr/bin/jackd -dalsa -r48000 -p256 -D -Chw:Device,0 -Phw:Headset,0  &
Jackd did not have any issue not being able to write to the filesystem, so read-only mode worked just fine.
Headless guitarix
Guitarix needs the bash home variable in order to try and
find the config. If I try to run a script from rc.local for example, this is
not set. Hence, the following is needed:
export HOME=/root
Guitarix also really does not like read-only filesystems. It
tries to write some config every time it starts, and if it fails, it gives up.
So basically what I quickly came up with, is to mount a tmpfs in the guitarix
directory, which is rw. The changes will be lost, but that’s fine by me. I
tarred the current config of guitarix which I found nice, and made sure it was
restored each boot.
mount -t tmpfs none /root/.config/guitarix/
mount -t tmpfs none /var/lib/misc/
cp /root/guitarixconf.tar /root/.config/guitarix/
cd /root/.config/guitarix/
tar xf guitarixconf.tar
guitarix -i system:capture_1 -o system:playback_1  -o system:playback_2 -b E:1 -nogui &
Controlling guitarix through wifi
I now had the system booting directly into a mode where the
linux amp kicked in, but what if I wanted to change a setting? Like the gain,
effects, etc.
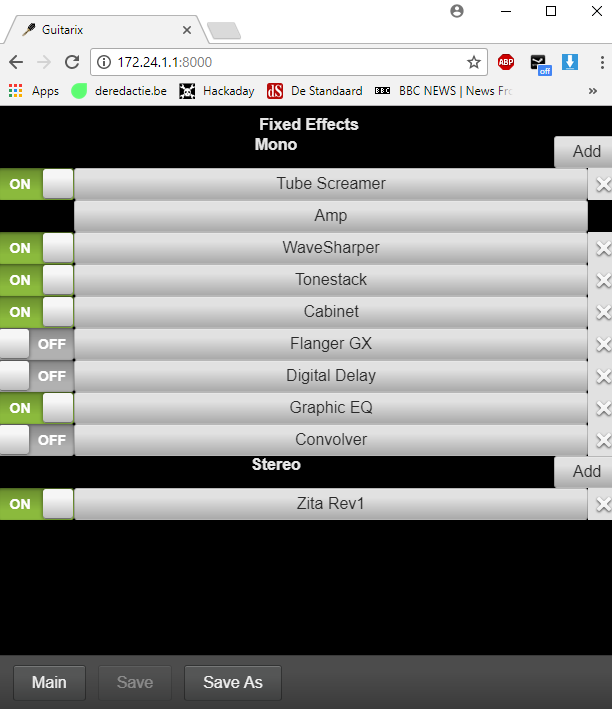
Turns out guitarix has a JSON-API and a python webserver
with a basic webinterface to do just
that!
Just start the python program after starting guitarix, and
navigate to the website. Ideal for surfing to on your smartphone to control the
device!
cd /root/guitarix-webui/guitarix-webui-0.34.0/websockify/
python websocketproxy.py --web=../webui '*':8000 localhost:7000

To allow using a smartphone to connect wirelessly to the
box, you can configure a wireless hotspot on the zero. The armbian has a nice
tool (like rpi-config) that allows you to set this up. If you want to do it
manually, just configure hostapd and dnsmasq appropriately, and let linux take
care of the magic.
Step 4: Reducing latency with a realtime kernel
I basically did step 2 and 3 in about one evening. Getting
the latency down took more than double of the time, but was also a pretty cool
investigation.
As every line of the jackd or guitarix documentation says,
you should run this on a real-time kernel. The armbian image I downloaded did
not run this, hence the issues when trying to go to lower delays. So, up to
recompiling a new kernel!
RT-linux patching
In contrast to the raspberry pi, the linux kernel support
for the orange pi (sunxi) is rather shady. Especially if you want the video
acceleration, you basically are forced to stay at an old 3.x kernel, which is
again different from mainline
This is important, since in order to get real good real-time
performance, you should use 1) a recent kernel, and 2) apply the RT patch (https://rt.wiki.kernel.org/index.php/Main_Page)
There is a topic on armbian which covered this: https://forum.armbian.com/topic/1885-rt-patches-for-sun8i-kernel/
People reported good results by trying a current mainline in
the armbian build tool and applying the RT-patch. So I set out to do the same.
Building a new kernel
Turns out that building a kernel for armbian is pretty easy.
Just follow https://docs.armbian.com/Developer-Guide_Build-Preparation/
git clone --depth 1 https://github.com/armbian/build
cd build
./compile.sh
You get a nice menu that allows you to select which kernel
to build, allows you to change kernel options etc.
It does automatically apply a set of patches in the folder “userpatches”
It does automatically apply a set of patches in the folder “userpatches”
Building a specific kernel with the RT patch
At the time of writing, the latest mainline kernel with an
RT patch was 4.18.8-RT9
I downloaded the patch, and placed it into the appropriate
directory:
ls userpatches/kernel/sunxi-next/
patch-4.14.8-rt9.patch
patch-4.14.8-rt9.patch
Then I did not immediately find a way to specify to the
build tool to fetch a specific tag of the linux kernel (instead of default to the very
latest) Doing a small patch was the fastest way I got it working. :
diff --git a/config/sources/sunxi_common.inc b/config/sources/sunxi_common.inc
index 4fc872f..aae8829 100644
--- a/config/sources/sunxi_common.inc
+++ b/config/sources/sunxi_common.inc
@@ -24,7 +24,8 @@ case $BRANCH in

        next)
        KERNELSOURCE=$MAINLINE_KERNEL_SOURCE
-       KERNELBRANCH='branch:linux-4.14.y'
+       #KERNELBRANCH='branch:linux-4.14.y'
+       KERNELBRANCH='tag:v4.14.8'
        KERNELDIR=$MAINLINE_KERNEL_DIR

        GOVERNOR=ondemand
(Note that I used the following tag of the armbian build
repo: 9531d1bc7ecd0f468e29e402ba00cbc7b7dd683f)
After running another compile.sh, and enabling the
correct options in the linux kernel menu (PREEMPT_RT_FULL), this gives a new
uboot and new kernel debian packages.
These can just be uploaded and installed on the target. A
new reboot and you are running a very fresh, very fast recent linux kernel!
Fixing fixed frequency for effective RT behavior
A good program to test the RT behavior is cyclic test. The
output looks somewhat like this:
Linux orangepizero 4.14.8-rt9-sunxi #1 SMP PREEMPT RT Sat Jan 6 14:36:31 CET 2018 armv7l armv7l armv7l GNU/Linux
/root/rt-tests/cyclictest -p 80 -t5 –n
# /dev/cpu_dma_latency set to 0us
policy: fifo: loadavg: 0.85 0.49 0.22 4/168 3083

T: 0 ( 3079) P:80 I:1000 C:   3297 Min:      8 Act:   17 Avg:   16 Max:      66
T: 1 ( 3080) P:80 I:1500 C:   2198 Min:      8 Act:   24 Avg:   15 Max:      50
T: 2 ( 3081) P:80 I:2000 C:   1648 Min:      8 Act:   11 Avg:   16 Max:      60
T: 3 ( 3082) P:80 I:2500 C:   1318 Min:      8 Act:   12 Avg:   15 Max:      44
T: 4 ( 3083) P:80 I:3000 C:   1098 Min:      9 Act:   17 Avg:   18 Max:      57
You should make sure the maximum latency stays below 100 at least
.
In my first attempts with my newly compiled kernel, this hit 3000+ regularly! Meaning the
RT patch clearly was not effective. Turned out a bit more work was needed
CPU Frequency Scaling Govenor
Apparently, to save power and dynamically adjust cpu
frequency, the linux cpu governor regularly changed frequency, and this had a
very bad effect on the RT behavior. When forcing the governor to performance
mode or userspace mode, I suddenly got much better results!
echo userspace > /sys/devices/system/cpu/cpufreq/policy0/scaling_governor
echo 960000 > /sys/devices/system/cpu/cpufreq/policy0/scaling_min_freq
echo 960000 > /sys/devices/system/cpu/cpufreq/policy0/scaling_setspeed
Forcing fixed frequency
You’d think that that was the end of it, and so did I.
Strangely enough, even when forcing the governor to a fixed frequency, the
linux kernel –still- once in a while (like after a minute, depending on jackd
realtime settings) shifted frequency, causing massive spikes in latency, and
freaking out jackd. After investigating the kernel a bit further, it seems that
it has some sort of protection that it will force to a lower operating point (OPP)
regardless of the governor, to avoid any damage to the CPU whatsoever. Even
though that sounds like a nice feature, the CPU can handle this load just fine,
and this just messes up the real-time behavior.
The final fix that I needed to do to get consistently good
RT performance, was to remove all other operation points from the device tree!
You can simply decompile the devicetree and recompile it using the DTC tool
like so:
dtc  -I dtb -O dts sun8i-h2-plus-orangepi-zero.dtb > sun8i-h2-plus-orangepi-zero.dts
dtc -I dts  -O dtb sun8i-h2-plus-orangepi-zero.dts > sun8i-h2-plus-orangepi-zero.dtb
Once in the dts format, you just locate the operating points, and only leave in the 960Mhz.
And success! Cyclic test keeps running forever without any
spikes!
root@orangepizero:~# uname -a
Linux orangepizero 4.14.8-rt9-sunxi #1 SMP PREEMPT RT Sat Jan 6 14:36:31 CET 2018 armv7l armv7l armv7l GNU/Linux
/root/rt-tests/cyclictest -p 80 -t5 –n
# /dev/cpu_dma_latency set to 0us
policy: fifo: loadavg: 0.85 0.49 0.22 4/168 3083

T: 0 ( 3079) P:80 I:1000 C:   3297 Min:      8 Act:   17 Avg:   16 Max:      66
T: 1 ( 3080) P:80 I:1500 C:   2198 Min:      8 Act:   24 Avg:   15 Max:      50
T: 2 ( 3081) P:80 I:2000 C:   1648 Min:      8 Act:   11 Avg:   16 Max:      60
T: 3 ( 3082) P:80 I:2500 C:   1318 Min:      8 Act:   12 Avg:   15 Max:      44
T: 4 ( 3083) P:80 I:3000 C:   1098 Min:      9 Act:   17 Avg:   18 Max:      57
Important sidenote of fixed OPP
One important sidenote of using a fixed opp, is that in very
heavy load, the cpu actually becomes so warm that the linux kernel (having no
other option since we removed the other OPPs) decides to reboot the device! I
only saw this ever happening when running a parallel compilation on all 4 cores
though. When just using it with guitarix/webstuff, I never got it to crash so
far:) You can also just lower the frequency or go save with a heatsink of
course if you’d want to.
Patching jackd to deal with latency spikes
While investigating the RT issues with the linux kernel, I
also noticed that jackd really got completely messed up when it received a bit
latency spike. Instead of noting an XRUN and just recovering, it never did
recover. I always then had to kill the process with the SIGKILL, and restart
it. Even though that works, it is really slow and requires manual action.
Surely there must be a better way?
And there is. Turns out there was a bug in the jackd alsa
driver when coping with xruns
In the function alsa_driver_xrun_recovery, the linux driver
is not told to again reset its buffers to a sane position upon overrun. As a
result, after a recovery, immediately another overrun can occur. To fix this, I
just had to trigger a recovery (snd_pcm_prepare) after an actual xrun was
detected:
if (snd_pcm_status_get_state(status) == SND_PCM_STATE_XRUN && driver->process_count > XRUN_REPORT_DELAY) {
       struct timeval now, diff, tstamp;
       driver->xrun_count++;
       snd_pcm_status_get_tstamp(status,&now);
       snd_pcm_status_get_trigger_tstamp(status, &tstamp);
       timersub(&now, &tstamp, &diff);
       *delayed_usecs = diff.tv_sec * 1000000.0 + diff.tv_usec;
       jack_log("**** alsa_pcm: xrun of at least %.3f msecs",*delayed_usecs / 1000.0);
       if (driver->capture_handle) {
           if ((res = snd_pcm_prepare(driver->capture_handle)) < 0) {
               jack_error("error preparing after xrun: %s", snd_strerror(res));
           }
       } else {
           if ((res = snd_pcm_prepare(driver->playback_handle)) < 0) {
                   jack_error("error preparing after xrun: %s", snd_strerror(res));
           }
I downloaded the source using apt-get source, and built it
again with debuild –us –uc, and installed it locally. And voila, a working
system!
Conclusion
This was a cool project, which hadn't been possible for the awesome open source community that provided many of the tools and toys to make this possible.
Linux rocks:)


Hi I very appreciate your work, but i have a question. I don't understand the part of Doing a small patch, is edited the 4.18.8-RT 9.patch? how to make this?
BeantwoordenVerwijderenThank you and sorry my ingles!!!
Hi,
BeantwoordenVerwijderenThanks and you're welcome:)
Regarding the "small" patch, I am assuming you are refering to "Doing a small patch was the fastest way I got it working."
This is a patch I did in the armbian build environment.
I used the linux 4.18.8-RT 9.patch as-is, but it obviously only works on that exact version of the linux kernel. By default, the armbian build environment tries to fetch the most recent linux kernel, which often does not (yet) have an appropriate RT patch. Let me know if I you are still stuck somewhere, trying to build the image
Yes, I'm still stuck in the build I can not seem to generate an image with the rt patch. I'm really needing the rt kernel on my orange pi zero. Would you somehow assist me in a image with the rt patch? Would you have any possibility of having your mail messaging? Thank you.
BeantwoordenVerwijderenHi, note that you could also just download the SD card image and take my compiled kernel from there. That saves you the trouble of compiling it yourself.
VerwijderenI see you also posted the question on https://forum.armbian.com/topic/2837-testers-wanted-real-time-kernel-image-builds-for-h3-boards/?tab=comments#comment-50464. I'll continue the discussion there, as that forum is more focussed on that topic
(BTW, the link for the SD card with working RT kernel is here once more: https://drive.google.com/file/d/1H8be9FOhea6YZ_ExDv6xd8meQfn182Ta/view?usp=sharing )
VerwijderenAwesome project!
BeantwoordenVerwijderenI'm looking to do something similar but with a Raspberry Pi 3 Model B. Would there be any compatibility issues with using your image file that was created for the orange pi?
Thanks Lucas!
VerwijderenThe SD card image I made was specifically for an orange pi zero. If you try it on your rpi, it won't even boot unfortunately:) A number of things that would need to be changed to run it:
- Change bootloader
- Change kernel
- If you want wifi, possibly some config files might need to change
In fact, since both processors should support the armv7 instrutionset, I'd guess if you update the bootloader and kernel that the image should boot. (If they didn't share the same instructionset, you'd need to recompile the entire image).
That being said, to be honest, if it were me I think I would just start from a raspbian image, and redo the things I did on the orange pi, rather than trying to port the image. You -can- of course have a look at the image (you can just browse the filesystems if you plug it as SD card into a linux pc), to see how I get things running.
Note that you'll also have to compile a real time kernel as well for the rpi, but I'd guess more people have done this before (versus with the orange pi).
Good luck in any case!
Awesome project!
BeantwoordenVerwijderenI want to do something similar but with a Raspberry Pi 3 Model B. Would there be any issues in trying to use your image for this model?
Hi! Super cool to see Full RT is working. From what I remember, Fully preemptible wasn't working last year!
BeantwoordenVerwijderenWhat is the lowest latency you could get in Jack? I see blocksize 256 for a latency of 5.3ms in the screenshot, did you try to get it any smaller?
Thanks Simon.
BeantwoordenVerwijderenIndeed, I use 256 as a default. 128 also works, but gives more sproradic xruns (sound glitches due to buffer under/overflow) which start to get annoying. I actually suspect that the armbian/xunxi kernel patches add some non-RT-patched code (like the wifi driver). In theory having a look at those could perhaps get the latency down even more.
On the other hand, to get to really low latency, I'd probably try bela sometime (bela.io). The problem there is that obviously you can't run guitarix on it of course, and so you'd have to do all the effects yourself.
Long story short: The blocksize of 256 works well on the zero, but less seems to be pushing it. If you focus, you can notice the audio delay, but only ever so slightly. I think it's still a pretty cool feat for this cheap hardware.
Thanks for your reply!
VerwijderenGood to know that 128 is working. I have a Nanopi Duo that has both audio input and output. I will try to see what I can get though I know that USB and I2S drivers don't have the same limitations in terms of blocksize, samplerate etc. than the internal audio codec which I'd prefer to stick to!
Isn't the RT patch the last one in the chain to be applied? From my understanding RT patch is low-level enough and guarantees that *any* operation will meet the realtime requirements, including kernel drivers. I might be wrong on that though!
I'm also interested in doing as much as possible with such cheap hardware. As with Bela I'm using libraries to make the effects, they should be much simpler and lighter on cpu than guitarix. Might make 128 much safer to use without xruns!
Another question: have you got any idea why you had to patch Jack? And why it had this behaviour? (not recovering) It seems surprising such stable software needed this fix as I, for one, am sure Jack is recovering from xruns in my experience on x86 Linux.
I'll test your kernel on Nanopi Duo! Thanks for your work and sharing
Hi,
BeantwoordenVerwijderenCool! Let me know how it's going on the nanopi, I'm curious!
For the RT patch, it is indeed the last one to be applied, but it only patches over stuff that is in the upstream kernel. If a xunxi driver was added in a previous patch, it is not affected. That being said, you're probably right on that -most- drivers don't actually need patching. But it's ceratinly no guarantee. If you write a driver that disables interrupts for a brief while (to avoid some locking), that will definitely kill the RT behaviour. I quickly browsed through the source: 90-02-add_rtl8189es-experimental.patch does add the wifi driver (indeed, not upstreamed). It is a bit too big to review, but I actually be somewhat surpised if it were fully RT ready.
Indeed, if you write your own audio loop, you should be able to get lower latencies more easily, as guitarix can be quite heavy. Note that in the past I've actually written a simple alsa program that does this (basically doing what jackd does, but only the bare essentials). Haven't actually tried that application on the orange pi, but I could actually do it sometime to check out what is the bare minimum latency I can get out of it. Anyway, curious to see what you get out of it!
Regarding the jackd patch, the issue is really in the audio kernel driver, and how it recovers. By changing how jackd interacts with the kernel, I can get better behaviour out of it. But in the end, you could argue that the (sunxi) audio kernel driver just behaves differently then what you get out of most of them (like the ones you have on x86). That's also why I didn't yet send a pull request. The real fix is probably in the kernel, but I didn't find any time to look at it, and as the current patch works for me, the incentive is low:)
Anyway, thanks for sharing, and keep us posted on your progress!
Kind regards,
Arnout
Thanks for your reply! I made some progress, imported your kernel and jack2 version from the SD image (found these in /root).
VerwijderenQuick question, have you had any issues with DBus apart from the export for the DBUSS session address?
I can't get jack2 to start, only jack1 will work.
I'm getting this error:
Failed to acquire device name : Audio0 error : Connection ":1.9" is not allowed to own the service "org.freedesktop.ReserveDevice1.Audio0" due to security policies in the configuration file
It's a known error but all the fixes I've tried aren't working, I hate it when systemd and dbus is getting in my way!!
Related: https://llllllll.co/t/beginning-a-gnu-linux-jack-headless-performance-system/1119/13
Thanks in advance
Now that you mention it, I do think I also had the same issue, but resolved it by editing some configuration file. (But apparently forget to document it) Your link seems to be spot on though. Have you tried editing /etc/dbus-1/system.conf ?
BeantwoordenVerwijderenYes and it had no effect at all.
VerwijderenI finally found a way, quite simple actually, using the env variable JACK_NO_AUDIO_RESERVATION.
Typing "export JACK_NO_AUDIO_RESERVATION=1", then jackd will start correctly.
Is it what you have to do?
Kinda crazy that this change is 4 years old (https://github.com/jackaudio/jack2/commit/a450cdcc4874028a52a82207c38b39ecb1ee1d64)
Yet it is documented only since last year in 1.9.12: https://github.com/jackaudio/jack2/commit/6680b60f42633fcb8692c20907341f738b73922b
Back to it!
My main usecase is either running Puredata directly or Puredata patches trans-compiled to C code using Heavy at https://enzienaudio.com/
Wow, this is awkward, the moderation email for this post never arrived (or I missed it), and your post remained unpublished for more than two years.. Better late then never I guess. My apologies for that, and glad you found it.
VerwijderenHello,
BeantwoordenVerwijderenDid you use the Wi-Fi Antenna that comes with the Orange Pi or can the system be accessed wirelessly without it?
Hey, this is great. Have you tried getting rakarrack to work on this set up?
BeantwoordenVerwijderenThanks:)
VerwijderenCool, I didn't even know rakarrack until now, it looks fancy though. But so no, I didn't :)
Sorry Matt, I accedentally deleted your comment where you asked whether I tried midi on guitarix. Nope, havent tried that either:)
VerwijderenNo worries, thanks for answering re:midi.
BeantwoordenVerwijderenCan you post some more screenshots of the web interface?
Hi,
VerwijderenThis is just the guitarix-webui. You can find some more shots at https://www.linuxmusicians.com/viewtopic.php?t=15339. Its basically just some dropdown boxes and sliders, but it suffices to easily control it from your smartphone. If you have a linux system, you can also easily install it yourself and try it out.
Not sure if this posted, so asking again.
BeantwoordenVerwijderenI bought an orange pi zero, installed your flashed sd image, but I'm having trouble connecting to it through wifi.
I can see the guitar wifi access point, but can't get it to connect using the pw you provided.
I plugged it into my home wifi router, and it lists a different ip address. When I go to port 8000 on that ip address the guitarix web interface comes up, but so does a pop-up that says 'connection to guitarix closed... retrying' and it keeps popping up.
Any thoughts? Am I missing a step somewhere?
Hi Matt,
VerwijderenHmm, strange.
For the wifi connection, I manage to connect with both my PC and smartphone using "guitarguitar" as password. I quickly opened the image with 7zip, and in /etc/hostapd.conf you can see the password there too.
Perhaps an important note: Did you connect any UFL antenna to it? If not, the signal strength might be too weak to retain the connection perhaps.
Through ethernet, you should also be able to access it, and it seems you do manage (since you see the guitarix webinterface). The popup "retrying" is typically shown when your client (pc/smartphone) looses connectivity to it afterwards. That might be for a number of reasons, so to try and pinpoint it, I would suggest to:
- Only connect to it over ethernet to start (disable wifi on your pc)
- start a ping session to it to make sure it is constantly reachable (ping -t)
- Then indeed surf to the address:8000
- Note, once you have connectivity, also try to ssh into it using putty (or just ssh if you are on linux). The password is also just guitar.
Who knows, you might be using a bad power supply causing the system to reboot sporadically, idk. Using the pings and ssh, you should be able to get more info about it.
Good luck!
By the way, it does come to mind that the image expects a USB headset to be plugged in + the other USB sound card to be there (for the input). If either of those is not there, it would make sense that you also get the "retrying" message I guess, since the guitarix backend won't reply.
VerwijderenYou need at least -some way- of getting sound into it, and sound out of it. If you only have a USB sound card with both input and output, I have a "preset" on the image actually. You should be able to activate it by surfing to address:8001/jackout.html.
In any case, if you ssh into it, "arecord -L" and "aplay -L" should show your sound interfaces. At boot, /root/restartjackguit.sh is called. In there, you will see something like " -Chw:Device,0 -Phw:Headset,0 ". You might have to change that to the relevant interface (if you have multiple)
Gl again in any case! :)
(And finally,
Verwijderen- if you want to change stuff on the filesystem, don't forget to make it writable first:) "mount -o remount,rw /".
- If you use the jackout.html, it is normal that you don't get a reply. After some 10s guitarix and jackd should start and you should hear something coming out of the jack + the webinterface (on port 8000 then) should be working correctly)
Fingers crossed:)
Hey, so I made some progress.
BeantwoordenVerwijderenRunning address:8001/jackout.html first really made a difference. I was able to connect it, get some sound, and the effects worked!
I'll mess around with /root/restartjackguit.sh and see if I can get it to load the proper configuration at boot.
The next thing I'm experimenting with is connecting a midi foot controller to it. I've been able to get a midi foot controller to work with guitarix on my laptop, but getting it to work with a pi device would be ideal.
I followed your directions to make the sd card writable mount -o remount,rw / and then ran sudo apt-get install a2jmidid
which installed the bridge to the jack bridge to alsa's midi controls -- only problem was alsa was not installed. So I'm going to poke around and see is I can 1. Get the orange pi to recognize the midi foot controller and 2. use the web api to assign midi controls to different buttons / sliders in guitarix. I will keep you posted.
Thanks for your help!
What do I change to make it use the USB headphone out instead of the bluetooth audio?
BeantwoordenVerwijderenHi chris,
BeantwoordenVerwijderenAt boot, /root/restartjackguit.sh is called. In there, you will see something like " -Chw:Device,0 -Phw:Headset,0 ", C for capture and P for playback device. You can change that to any recognized also interface. Use aplay -L and arecord -L to figure out which one you need.
Note: to make modifs to the filesystem you will have to remount it rw: "mount -o remount,rw /"
Good luck!
Hello, installed the image in an SD, I connect the USB audio card, I feed the orange PI with a smartphone charger but when I enter the address 172.24.1.1:8000 I don't see anything :(
BeantwoordenVerwijderenI'm NOT using headphones or any output yet ...
Hi, are you using the orange pi zero, or the orange pi? The SD card image configures the onboard wifi chipset of the orange pi zero in AP mode, and expects the smartphone to connect to that network wirelessly. Then, you should be able to connect.
VerwijderenI managed to get it to work, the SD card was corrupted.
Verwijderencan wav files be loaded from IR´s?
VerwijderenI am using an orange pi zero like yours, I already made it work, I can access the url, but in the output of the usb audio card I have dry sound, without any effect: /
The default effect in guitarix is "clean". I'm guessing this is what you are hearing? In the web interface, select another effect to actually get some distortion for example. I don't know what you mean with "IR", but you can play wave files for sure, although I never tried
Verwijderenwhen I visit the guitarix website there is already a bank called "reverb" with various effects activated.
VerwijderenAnyway I tried deleting them and loading others, and nothing changed, just clean sound, I couldn't save my own preset either, it always starts with that default bank.
I tried to follow the tutorial in detail to configure and record my own image but I only get to the part of installing the jack without being able to then open it to configure the outputs and inputs of my usb audio card.
by IR I mean pulse response in wav format.
I connect using "putty" through the COM port.
I use only common wired headphones and a usb audio card with mic in and headphone out.
sorry for the delay in my response, I wanted to keep trying on my own, before bothering you again.
From already thank you very much !
Hi,
VerwijderenNo prob:) It's probably easier to start from my image. As you only have a soundcard with both mic and speakers (and no USB headeset), your configuration will be different. I'm guessing this is why you are having these issues?
See my post of may, here again:
If you only have a USB sound card with both input and output, I have a "preset" on the image actually. You should be able to activate it by surfing to address:8001/jackout.html.
In any case, if you ssh into it, "arecord -L" and "aplay -L" should show your sound interfaces. At boot, /root/restartjackguit.sh is called. In there, you will see something like " -Chw:Device,0 -Phw:Headset,0 ". You might have to change that to the relevant interface (if you have multiple). In case of the jackout, the -Phw:Headset,0 is replaced with -Phw:Device,0.
If this doesn't yet fix it, you can try posting the output of arecord -L and aplay -L here, to double check that the system actually detects your sound card correctly first.
thanks for your answer, well re-install your image and I tried what you told me.
VerwijderenI had seen the comment on the address 8001 (I have read your post hundreds of times these days) and I could not access the address, I wrote it in various ways: "172.24.1.1:8001/jackout.thml" - ": 8001 / jack .html "and , http, www, localhost ... etc etc.
As you will see, I do not know anything about linux: /, I must say that with this project I am very interested in learning, I have read a lot and how it works does not seem so abstract anymore, but my little knowledge
it stopped me... anyway I guess I am typing the wrong address or in the wrong place, I type it in the browser, I first try to connect at 172.24.1.1:8000, I connect without problems and I have constant ping. but I don't know how to open the address to open the xD jack settings
Hmm, if you manage to connect to 172.24.1.1:8000, the other one is just the same (172.24.1.1:8001/jackout.thml). Note that you shouldn't expect any real website to load. All this does (type "cat /root/ownwebserver/ownserv.py" to see for your self) is execute a shell command with the ease of a smartphone link (instead of having to log in in the shell and type it manually). Since you already have console access, you -can- just as well do it manually: "sudo /root/restartjackguitsoundcard.sh".
VerwijderenThe effect of that script, is that jackd is restarted with different alsa ports. If this doesn't work, you should look at the arecord -L and aplay -L output to find out whether your card is actually supported by the alsa.
Good luck!
good day ! I was finally able to make it sound good, I think I needed to get some sleep and then resume xD.
VerwijderenI hope I don't bother you with the following questions or wishes rather ...
I was able to add, remove and modify effects and banks, but can't save them after restarting the OPI ... is there a way to achieve this? that every time a preset is modified and saved, it gets saved to SD with every reboot?
.....
Did you see the new webui guitarix that came out a few days ago?
Good to hear!
VerwijderenTo avoid SD card corruption when the system is hard unpowered, I simply mounted the entire filesystem as read-only, with some tmpfs mounts here and there. The big advantage is that, if it works once, it will always keep working the next boot. But indeed, the disadvantage is that you cannot modify anything like presets:)
If you want to change this behavior (and let guitarix persist its config) you can modify the /etc/fstab and change the ro->rw and in /root/boot.sh and delete all the lines that contain "conf" in it (which overlay tmpfs and copy a fixed config every time at boot to it).
I did not check out the new webui yet, thanks for the tip:)
Hi !
VerwijderenWell, I was paying attention to your instructions.
modify the two files as indicated, I must clarify that I opened them with "notepad" in windows and could not visualize the code well.
install notepadcc ++ and everything was much clearer.
I was not lucky anyway.
I detail the changes in each files here below.
FSTAB:
UUID=4363f978-5805-4ea7-bc07-55ff06a65466 / ext4 defaults,noatime,nodiratime,commit=600,errors=remount-rw,rw 0 1
tmpfs /tmp tmpfs defaults,nosuid 0 0
BOOT.SH: ( * ERASED )
export DBUS_SESSION_BUS_ADDRESS=unix:path=/run/dbus/system_bus_socket
export HOME=/root
service cpufrequtils stop
echo userspace > /sys/devices/system/cpu/cpufreq/policy0/scaling_governor
echo 960000 > /sys/devices/system/cpu/cpufreq/policy0/scaling_min_freq
echo 960000 > /sys/devices/system/cpu/cpufreq/policy0/scaling_setspeed
* dhclient -i eth0 &
* mount -t tmpfs none /root/.config/guitarix/
* mount -t tmpfs none /var/lib/misc/
cd /root/.config/guitarix/
cd /root
service dnsmasq restart
sleep 1
/usr/bin/jackd -dalsa -r48000 -p256 -D -Chw:Device,0 -Phw:Headset,0 &
sleep 2
guitarix -i system:capture_1 -o system:playback_1 -o system:playback_2 -b E:1 --nogui &
cd /root/guitarix-webui/guitarix-webui-0.34.0/websockify/
python /root/ownhttpserver/ownserv.py &
python websocketproxy.py --web=../webui '*':8000 localhost:7000
Can I ask how you modified the files in windows? I guess the SD card is ext4 formatted. Perhaps you modified it directly from a zip image with something like 7zip? (The reason notepad looks weird and notepad++ looks fine is that linux uses different line endings, and notepad++ recognizes this).
BeantwoordenVerwijderenAside from modifying it on the image/sd card, you could also do it on the target device itself (using an editor like "nano", but then you'd have to remount the filesystem rw first). You can do that by typing "mount -o remount,rw /".
Anyway, there's no need to disable the dhclient (marked with *), but since you don't have ethernet plugged in, you won't notice the difference. You seem to have removed that tar unzipping already (not marked with a star, but that's ok).
In fstab, the remount-rw can remain remount-ro (this only happens if the filesystem runs into errors).
Other then these points, I would guess it should work.
You can check by after booting, log in with the console, and type "mount", or just try to create any file llike "touch /somefile.txt", and see that that does not give an error. If not, the SD card is mounted RW. If the tmpfs mount is disabled, guitarix should then save its config directly to the SD card instead of ramfs, and the change should be presistent. (If tmpfs is mounted, you should see this as well in the output of "mount"). Again, feel free to "touch" a file inside /root/.config/guitarix, or actually inspect the files after you change something in the guitarix webui. The changes should be there, and should then persist after a reboot.
Good look anyway!
Hello!
VerwijderenI install ext2SD to see partitions in windows, modify the files directly, but then I realized that it did not work, the changes were not saved.
i try in the console and I works better, first I run "mount -o remount, rw /", then I modify "boot.sh" and "fstab", reboot.
I started the webui, I made some changes, save the new banks and when I removed the power and turned on, everything remained the same without changes.
I did all this again but after saving the changes, execute "reboot" from the console and when starting and making changes, they WERE SAVED! :).
the only problem in this is that you have to access the console and restart the board every time you want to change or modify something. Is there something I do wrong? ...
I confess that I had a lot of fun reading and playing with the commands ... my next challenge would be to test the new webui and modify the initial presets :D
My main idea would be to make a portable amplifier with the possibility of customization, with power D.
Finding me with his enormous work brought light to my distant project and the desire to learn something new
Hello,
BeantwoordenVerwijderenI can't get it to work... Here's the output of aplay -L
aplay -L
null
Discard all samples (playback) or generate zero samples (capture)
default:CARD=Set
C-Media USB Headphone Set, USB Audio
Default Audio Device
sysdefault:CARD=Set
C-Media USB Headphone Set, USB Audio
Default Audio Device
front:CARD=Set,DEV=0
C-Media USB Headphone Set, USB Audio
Front speakers
surround21:CARD=Set,DEV=0
C-Media USB Headphone Set, USB Audio
2.1 Surround output to Front and Subwoofer speakers
surround40:CARD=Set,DEV=0
C-Media USB Headphone Set, USB Audio
4.0 Surround output to Front and Rear speakers
surround41:CARD=Set,DEV=0
C-Media USB Headphone Set, USB Audio
4.1 Surround output to Front, Rear and Subwoofer speakers
surround50:CARD=Set,DEV=0
C-Media USB Headphone Set, USB Audio
5.0 Surround output to Front, Center and Rear speakers
surround51:CARD=Set,DEV=0
C-Media USB Headphone Set, USB Audio
5.1 Surround output to Front, Center, Rear and Subwoofer speakers
surround71:CARD=Set,DEV=0
C-Media USB Headphone Set, USB Audio
7.1 Surround output to Front, Center, Side, Rear and Woofer speakers
iec958:CARD=Set,DEV=0
C-Media USB Headphone Set, USB Audio
IEC958 (S/PDIF) Digital Audio Output
dmix:CARD=Set,DEV=0
C-Media USB Headphone Set, USB Audio
Direct sample mixing device
dsnoop:CARD=Set,DEV=0
C-Media USB Headphone Set, USB Audio
Direct sample snooping device
hw:CARD=Set,DEV=0
C-Media USB Headphone Set, USB Audio
Direct hardware device without any conversions
plughw:CARD=Set,DEV=0
C-Media USB Headphone Set, USB Audio
Hardware device with all software conversions
What/how should I cange the startup script?
Thanks
OK, sound is coming out, but no effects... I enabled different effects, but the sound is still "clean". Any ideas?
BeantwoordenVerwijderenGot it to work, I changed the sound care and suddenly the effects we're there. How do you use this setup in real life? Do you feed the output into the input of a guitar amp?
BeantwoordenVerwijderenHello, glad you got it to work! I use the wireless headset to listen to the sound, and bypass my old guitar amp entirely (if that's what you mean't).
BeantwoordenVerwijderenHello,
BeantwoordenVerwijderenA quick question: what is the best way of saving the banks and presets? Is it by mounting the file system as writeable, programming everything and then mounting it as read-only?
Hi, that's how I did it yes:) You could also keep it writable all the time but risk corruption when unplugging it. Alternatively you could create a second RW partition, overlayed just for the config. Then only that could get corrupt worst case. Anyway, if your presets are +- constant, the temporary RW method is pretty workable:)
BeantwoordenVerwijderenMaybe I missed it in your article, but I didn't see how you matched the impedance of the guitar to the usb sound card.
BeantwoordenVerwijderen